Cricut Vinyl for Beginners: How to Pick Between Adhesive and Heat Transfer Vinyl
Crafting with Cricut machines opens up a world of creativity, particularly when it comes to using different types of vinyl. Beginners often find themselves facing the dilemma of choosing between adhesive vinyl and heat transfer vinyl (HTV). Understanding the nuances between these two types of cricut vinyl is essential for achieving the best results in your projects. In this article, we will discuss the differences, types, cutting techniques, application methods, and when to use each type of vinyl.
- What is the Difference Between Adhesive Vinyl and Heat Transfer Vinyl (HTV)?
- What Are the Different Types of Craft Vinyl Available?
- How to Cut Your Vinyl with a Cricut Machine?
- How to Apply Adhesive Vinyl and HTV?
- When Should You Use Adhesive Vinyl vs Heat Transfer Vinyl?
- Q: What’s the difference between permanent vinyl and removable vinyl?
- Q: How do I know when to use HTV vs adhesive vinyl?
- Q: Can I use heat transfer vinyl on any type of fabric?
- Q: What are the differences between heat transfer vinyl and adhesive vinyl?
- Q: How do I cut with the vinyl for my projects?
- Q: What kind of projects can I create with adhesive vinyl?
- Q: Is iron-on vinyl the same as heat transfer vinyl?
- Q: How can I ensure my HTV lasts on clothing?
- Q: What specialty vinyl options are available for unique projects?
What is the Difference Between Adhesive Vinyl and Heat Transfer Vinyl (HTV)?
What is Adhesive Vinyl?
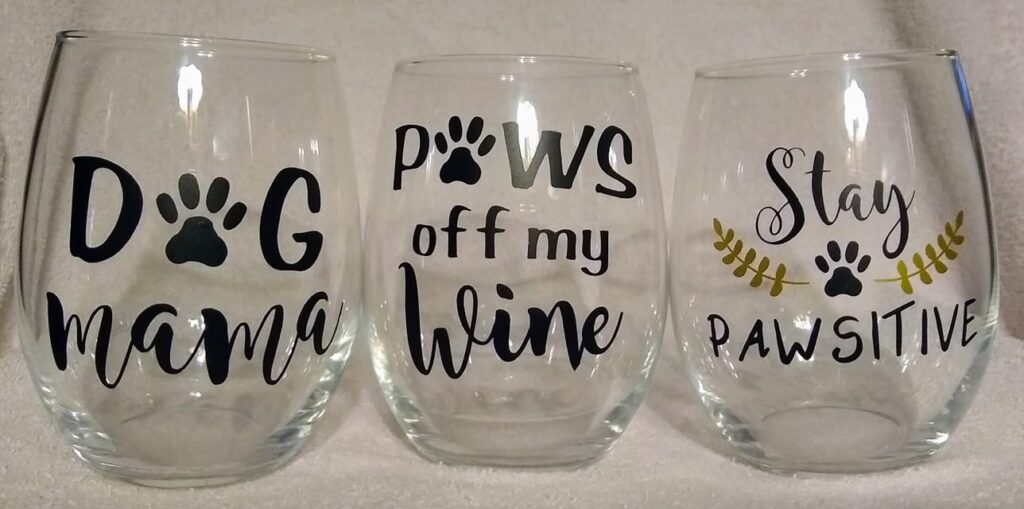
Adhesive vinyl is a versatile type of vinyl that comes with a sticky backing, allowing it to be easily applied to a variety of surfaces. Typically, this type of vinyl is used for creating vinyl decals, labels, and stickers. Adhesive vinyl is often categorized into two main types: permanent vinyl and removable vinyl. Permanent vinyl is designed to withstand harsh weather conditions and is ideal for outdoor projects, while removable vinyl is great for temporary applications and can be repositioned without leaving a sticky residue. The application process involves using transfer tape, which helps to lift the vinyl decal from its backing and place it onto the desired surface.
What is Heat Transfer Vinyl (HTV)?
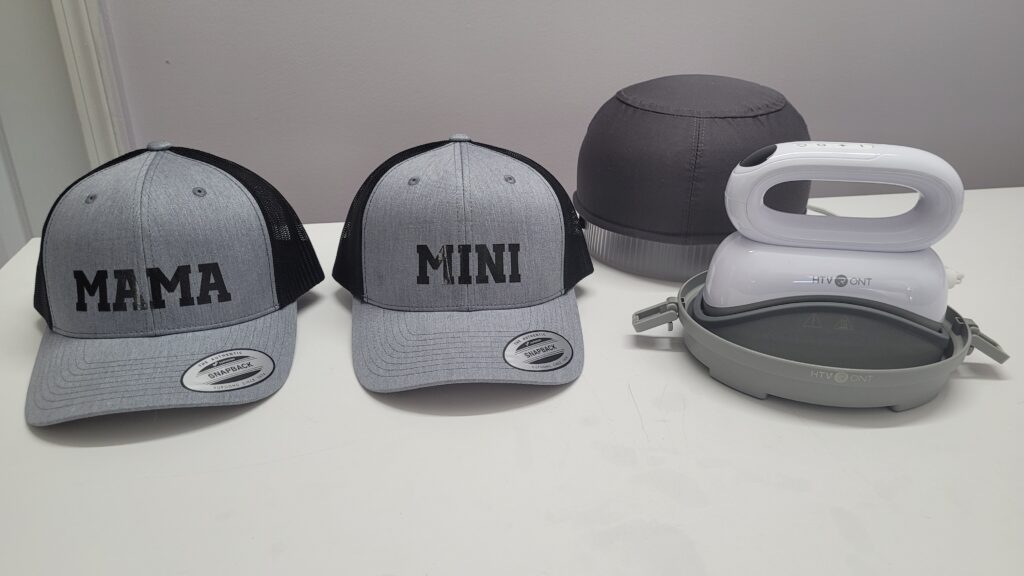
Heat transfer vinyl (HTV), also known as iron-on vinyl, is specifically designed to be applied to fabrics. This type of vinyl comes with a heat-sensitive adhesive on the back that activates when heat is applied. HTV is typically available in various finishes, including glitter vinyl and holographic vinyl, allowing for a range of creative options. To apply HTV, you will need to use a heat press or an iron, which ensures that the vinyl adheres properly to the fabric. Unlike adhesive vinyl, HTV is not suitable for non-fabric surfaces, making it essential to choose the right type of vinyl for your project.
How Do Adhesive Vinyl and HTV Compare?
The primary difference between adhesive vinyl and HTV lies in their application methods and suitable surfaces. Adhesive vinyl can be used on a variety of materials, including wood, glass, and plastic, making it versatile for many crafting projects. In contrast, HTV is specifically formulated for use on fabric, making it the ideal choice for apparel, bags, and other textile-based items. Additionally, while adhesive vinyl is typically a one-step application process, HTV requires heat to activate its adhesive properties, meaning it involves a bit more equipment and preparation. Understanding these differences will help you determine which type of vinyl to use for your next crafting venture.
What Are the Different Types of Craft Vinyl Available?
Types of Adhesive Vinyl
When exploring adhesive vinyl, you will encounter several types that serve different purposes. The two main categories are permanent vinyl and removable vinyl. Permanent vinyl offers a strong adhesive, making it ideal for outdoor projects like signage and car decals, as it can withstand the elements. Removable vinyl, on the other hand, is perfect for temporary applications, such as wall decals and seasonal decorations. Within these categories, you can also find premium vinyl options that provide enhanced durability and a wide range of finishes, including glossy, matte, and even metallic. Each type of adhesive vinyl has its unique characteristics, making it essential to choose the one that best suits your project needs.
Types of Heat Transfer Vinyl
Heat transfer vinyl (HTV) comes in various types, each designed for specific applications. Standard HTV is the most common and is suitable for a range of fabrics. Glitter HTV adds a sparkly finish, perfect for creating eye-catching designs on clothing. Holographic vinyl, with its striking iridescent finish, is another popular choice for those looking to make a bold statement. Additionally, there are specialty types of HTV, such as flocked vinyl, which offers a soft, textured feel, and reflective vinyl, which enhances visibility in low-light conditions. Understanding the different types of HTV will help you select the right vinyl for your fabric-based projects.
How to Choose the Right Type of Craft Vinyl?
Choosing the right type of craft vinyl depends on several factors, including the surface you are working with and the desired outcome of your project. For projects involving hard surfaces, adhesive vinyl is typically the best choice, while HTV is essential for fabric applications. It’s also important to consider the durability required for your project; if you need something that withstands the elements, go for permanent adhesive vinyl or high-quality HTV. Additionally, the aesthetic appeal of your finished product can guide your choice — if you’re looking for something flashy, consider using glitter or holographic vinyl. Ultimately, understanding the characteristics of each type of vinyl will help you make informed decisions that elevate your crafting experience.
How to Cut Your Vinyl with a Cricut Machine?
Preparing Your Design for Cutting
Before you can cut your vinyl with a Cricut machine, you need to prepare your design. Start by selecting or creating your design in Cricut Design Space, the software that pairs with your Cricut machine. Make sure to size your design appropriately for the type of vinyl you are using. For HTV, always mirror the design as the adhesive side must face the fabric during application. Once your design is ready, ensure that your vinyl is securely placed on the cutting mat, aligning it properly to avoid any cutting errors.
Choosing the Right Settings for Different Types of Vinyl
Choosing the correct settings for your Cricut machine is crucial to achieving clean cuts. Each type of vinyl requires different cutting settings. For adhesive vinyl, you will typically select the “Vinyl” option in the machine settings, while for HTV, you should choose the “Iron-on” setting. Additionally, depending on the thickness and type of vinyl, you may need to adjust the pressure and speed settings to ensure optimal cutting. Always perform a test cut on a small piece of vinyl to verify that your settings are accurate before proceeding with your full design.
Best Practices for Cutting Adhesive Vinyl and HTV
When cutting adhesive vinyl and HTV, there are several best practices to keep in mind. First, always ensure that your blade is sharp; a dull blade can lead to tearing or incomplete cuts. For adhesive vinyl, use a standard grip mat, while for HTV, a light grip mat can be more effective, as it prevents the vinyl from sticking too firmly and allows for easier removal. After cutting, use a weeding tool to carefully remove excess vinyl from your design, ensuring that all intricate details are preserved. Properly following these best practices will ensure the highest quality results in your vinyl crafting endeavors.
How to Apply Adhesive Vinyl and HTV?
Applying Adhesive Vinyl Decals
Applying adhesive vinyl decals is a straightforward process. Once your design is cut and weeded, use transfer tape to lift the vinyl from the backing. Carefully place the transfer tape over your vinyl decal, ensuring that it adheres evenly. Next, burnish the transfer tape with a scraper tool to ensure the vinyl sticks to the tape, then peel away the backing paper. Position the vinyl on your intended surface, and again, use the scraper tool to apply even pressure, ensuring a solid bond. Finally, gently peel away the transfer tape to reveal your beautiful vinyl decal. This method ensures that the vinyl adheres smoothly without bubbles or wrinkles.
Using a Heat Press for Iron-on Vinyl
When it comes to applying heat transfer vinyl, using a heat press is the most effective method. Start by preheating your heat press according to the manufacturer’s instructions for the specific type of HTV you are using. Position your fabric on the heat press and place your weeding vinyl design on top, with the adhesive side facing the fabric. Cover the design with a protective sheet, such as parchment paper, to prevent any damage. Close the heat press and apply the recommended pressure and time settings. Once the timer goes off, carefully lift the heat press and allow the design to cool slightly before peeling away the carrier sheet. This method ensures that the HTV adheres securely and evenly to your fabric.
Tips for Perfect Application of HTV
To achieve perfect application of heat transfer vinyl, consider a few helpful tips. Ensure that your fabric is clean and free from any moisture or wrinkles before applying HTV, as this can affect the adhesion. Use a heat-resistant mat underneath your fabric to protect your work surface. If you’re using a home iron instead of a heat press, be sure to apply consistent pressure and move the iron in a circular motion to distribute heat evenly. Always follow the manufacturer’s guidelines for temperature and time settings for your specific type of HTV. Lastly, allow your design to cool completely before removing the carrier sheet to prevent any lifting or distortion of your vinyl.
When Should You Use Adhesive Vinyl vs Heat Transfer Vinyl?
Best Projects for Adhesive Vinyl
Adhesive vinyl is incredibly versatile and can be used for a wide range of projects. Ideal applications include creating custom labels for jars and containers, crafting personalized decals for walls, and designing unique stickers for scrapbooks or planners. Additionally, adhesive vinyl works well for outdoor signage, as permanent vinyl is designed to withstand exposure to the elements. When looking for a quick and easy crafting solution, adhesive vinyl is often the go-to choice, thanks to its straightforward application process and compatibility with various surfaces.
Best Projects for Heat Transfer Vinyl
Heat transfer vinyl (HTV) shines in fabric-related projects, making it the perfect choice for creating custom t-shirts, tote bags, and home décor items like pillow covers. HTV is ideal for designs that require durability and flexibility, as the adhesive bonds securely to fabrics, allowing for stretch and movement. Whether you’re personalizing apparel for a special event or crafting gifts for friends and family, HTV offers endless design possibilities and is particularly effective for intricate or multi-layered designs.
Factors to Consider When Choosing Between Vinyl Types
When deciding between adhesive vinyl and heat transfer vinyl, consider the type of material you are working with and the longevity of the project. For hard surfaces, adhesive vinyl is typically the best option, while HTV is essential for fabric applications. Think about how permanent you want your design to be; if you need something that withstands outdoor conditions, go with permanent adhesive vinyl, but for temporary applications, removable vinyl is ideal. Additionally, consider the finish you desire; if you’re aiming for a shiny look, premium adhesive vinyl is a great choice, whereas glitter or holographic HTV can add a unique flair to your fabric projects. By assessing these factors, you will be well-equipped to choose the right type of vinyl for your crafting needs.
Q: What’s the difference between permanent vinyl and removable vinyl?
A: Permanent vinyl is designed to create long-lasting projects and is typically used for outdoor applications, while removable vinyl is easier to peel off surfaces without leaving residue, making it great for temporary decorations or projects.
Q: How do I know when to use HTV vs adhesive vinyl?
A: Use HTV (heat transfer vinyl) when you want to apply designs to fabric using heat, such as clothing or bags. Choose adhesive vinyl for hard surfaces like glass or wood where you want a sticky design without heat.
Q: Can I use heat transfer vinyl on any type of fabric?
A: While HTV works well on most fabric types, it’s important to check the manufacturer’s recommendations, as some fabrics, like 100% polyester, work better than others.
Q: What are the differences between heat transfer vinyl and adhesive vinyl?
A: The main difference is in application: HTV is applied using heat (with an iron or heat press), while adhesive vinyl sticks directly to surfaces without heat. Additionally, HTV is often more durable on fabric.
Q: How do I cut with the vinyl for my projects?
A: To cut with vinyl, load the vinyl into your cutting machine, ensure the correct settings for the type of vinyl (permanent or removable), and follow the manufacturer’s instructions for cutting designs.
Q: What kind of projects can I create with adhesive vinyl?
A: Adhesive vinyl is great for creating decals, signs, stickers, and craft projects on surfaces like walls, mugs, and furniture.
Q: Is iron-on vinyl the same as heat transfer vinyl?
A: Yes, iron-on vinyl is another name for heat transfer vinyl (HTV). Both terms refer to vinyl that requires heat for application onto fabric.
Q: How can I ensure my HTV lasts on clothing?
A: To ensure your HTV lasts, use a heat press for even heat distribution, follow the recommended application settings, and wash the garment inside out in cold water.
Q: What specialty vinyl options are available for unique projects?
A: There are many different types of specialty vinyl, including glitter, holographic, and metallic finishes, which can add unique effects to your projects.
