How To Set Up A New Website
Starting a Website
One of the things I wish I had done earlier is set up a website for my small business. A website is a great way to let people know that you are serious about starting your own business. Owning a website lends credibility to your business and implies that you are planning on sticking around for a while. In this article, I’ll walk you through how to set up a simple website to maximize your money making potential. I will also provide some tips that I wish I knew when I first started my journey to becoming my own boss and working from home with my Cricut.
This post contains affiliate links. Cricuter.com may receive a commission if you click through and purchase something. Support us today!
1) Pick a Domain Name
The first step, and one of the most important steps, is choosing a domain name.
This is the address that people will type into their web browser to find your site. For example, Cricuter.com is our domain. All of your pages will have addresses that begin with your domain. Since this will be the online address of your business, your domain should include the name of your business. A domain can end in the popular “.com” suffix, but there are also many more options like .store, .biz, and .co that can help you get the web address you want.
Registering a domain costs a small amount of money, but the prices are very affordable. They range from under $10 a year from public sites to hundreds of dollars a year from private sellers
You can use this handy tool below to check if your domain is available. Before you buy one, though, keep reading to find out how to get a FREE domain with a web hosting plan.
2) Purchase Hosting for Your Domain
Now that you know what you want your web address to be, you need to host the website so people can access it online.
The easiest way to host your domain is to pay a company to host it for you. Plans start at a few dollars per month for basic plans, and scale up from there with the inclusion of features at each tier of support. There are 2 really great, affordable options I typically recommend to people just starting out, and those options are SiteGround and Bluehost. For people wanting an all in one solution and are willing to spend a little more for a premium experience and easy to use tools to make a turnkey site, WP Engine is the perfect product for them. By partnering with WP Engine, we can offer our readers 3 Free Months when they purchase an annual plan through our link!
SiteGround
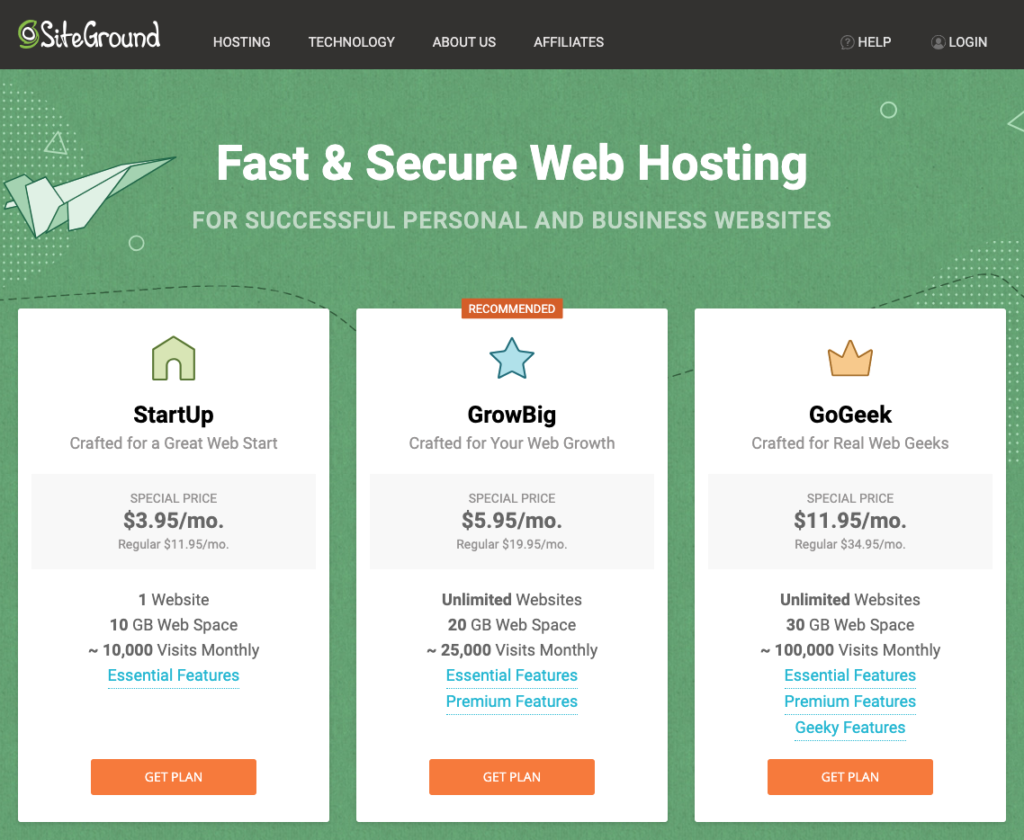
SiteGround offers high-class hosting services and is an incredible, comprehensive hosting package. Siteground runs on Google cloud, making it one of the fastest hosts you can work with. This ensures that your customers don’t have to deal with long page loads interrupting their shopping experience on your site.
SiteGround comes in 3 tiers starting at only $3.95 a month for the basic option, with a money back guarantee if you aren’t satisfied, so there is no risk to trying them out. This includes a domain name and an email address creator so you can have custom email addresses for everyone collaborating on your website. I recommend the GrowBig tier of service, which allows you to host unlimited websites, backup your website to their cloud to prevent any data loss, and if you already have a site, they will transfer it for you for free. It’s had to beat value like that.
One thing that really sets SiteGround apart is the unmatched customer support they provide. They offer live chat support, call in phone support, or the traditional support ticket style of support. If you get stuck or confused, help is only a phone call away
SiteGround also offers several really convenient tools, including a WordPress Starter plugin to get you started making a unique website on WordPress (more on that in the next section) without needing to know how to code anything.
Bluehost
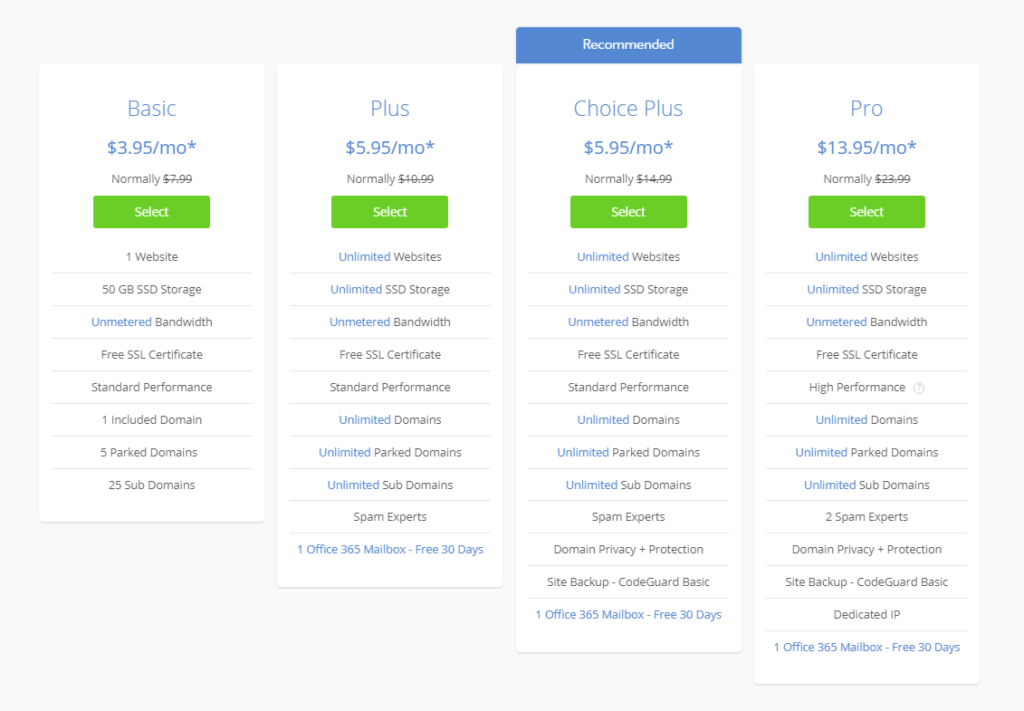
Bluehost is another great option for hosting your website. Bluehost is one of the top recommended WordPress providers, with incredible 24/7 support. Installing WordPress onto your site takes just one click, so there is nothing technical you need to do to get started.
Bluehost starts at 3.95 a month for the basic tier, with a 30 day money back guarantee if you aren’t satisfied with them, so there is no risk to try them out. This includes a free domain (your web address) for one year. I recommend the Choice plus tier, which includes unlimited storage, unlimited domains, and a site backup feature to prevent data loss for a small increase in price.
Bluehost runs on Cloundfare, an incredibly speedy CDN to make sure your pages load as quickly as possible.
WP Engine and Studiopress
The premium option for hosting is WP Engine. WP Engine is for people who want worry free hosting, who just want everything handled for them so they can focus on creating content for their site. It is lightning fast and so easy to set up. They have an incredible customer support team to help you get up and running if you get stuck.
WP Engine is unique among these hosting options because it comes with Studiopress, a collection of elegant, customizable themes so you can get a barebones website up and running in just one click. Keep reading below to see just how powerful a theme can be. You can use Studiopress with any host, but only WP Engine includes access to all of the themes for free. That’s over $2000 worth of themes, at no additional cost. All of the Studiopress themes come with customer support included, so if anything isn’t just how you like, Studiopress is there to help you along the way.
As with Bluehost and SiteGround, there are 3 tiers of hosting. Each tier gets you more and more features, such as more websites, more bandwidth for traffic, and priority support.
3) Install WordPress (or another site platform)
So I’ve said the word WordPress a couple times in this article, but what exactly is it? WordPress is the software you will use to actually create all the stuff people see when they visit your page. It is one of the most popular platforms for creating your sites.
Installing WordPress is incredibly easy! After you purchase your domain and hosting package, just click the big INSTALL WORDPRESS button. Or, if you get lost, see the instructions for Bluehost HERE, Siteground HERE, or WP Engine HERE
4) Choose a Theme (Free Vs Paid)
The next step is choosing a theme. A Theme is basically a skin for your website that sets up how each page looks. There are many free themes available in the WordPress Theme Directory, but free themes typically lack support, advanced features, and can lock away features behind a paywall, essentially making them trails of the real thing.
This is where WP Engine and Studiopress shine. You get access to over 35 premium themes for no extra cost over what you paid for hosting. Purchasing all of the themes individually would cost you over $2000, so you can really see the value in WP engine. There is no risk of buying a theme, deciding you don’t like it, and having to buy another. You already have access to them all.
There are several reasons to go with a Premium theme over a free one. The most important is access to updates and support for your theme. As new features are added to WordPress over time, sometimes you get a hiccup where something doesn’t work like it did before the update. Developers of paid themes have support you can go to for help, and update things constantly to keep things running smoothly. Free themes can be hit or miss with this, so in my opinion, it is more than reasonable to pay a small upfront fee (or not if you host with WP Engine!) to make sure your website will always be running as intended.
5) Create your Pages
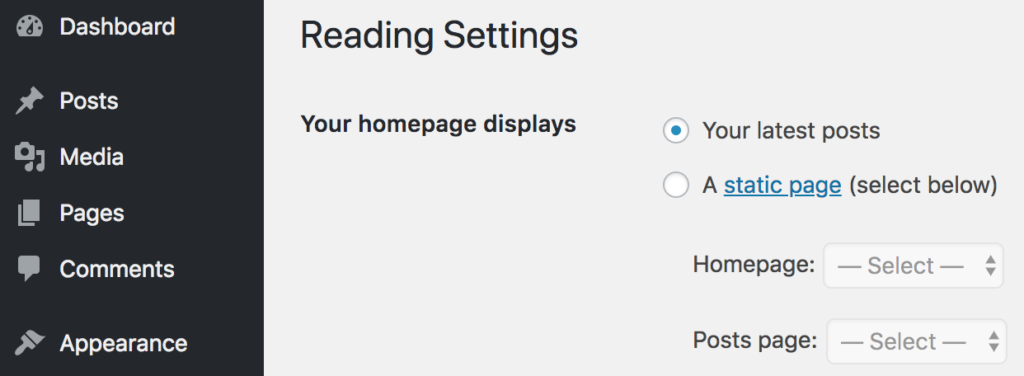
Now that you have your theme set up, it’s time to create your Pages! By default, wordpress sets your main page as your most recent blog posts. However, you can set up a home page instead. First, go to Pages>Add New and follow the prompts to create a Home page and a Blog page, if you plan on blogging your latest products.
To tell WordPress to send people to your home page first instead of your blog, go to Settings>Reading and go to the section titled Your Home Page Displays: Tick the radio button next to A Static Page. Then, use the drop down boxes to select your home page that you created for the Homepage, and the Blog page you created for the Posts Page.
6) Create Your Store
Finally, you can set up your online store! WooCommerce is the most popular platform to manage your new online store. You can sell physical or digital goods (or both!) with no limits on the number of products or users. The best part- It’s FREE!
To add Woocommerce to your WordPress site:
- Log into your WordPress site.
- Go to: Plugins > Add New.
- Search for ‘WooCommerce’.
- Select Install Now when you see it’s by Automattic.
- Select Activate Now and you’re ready for the WooCommerce Wizard!
Once that’s complete, your store is ready for you to add products!
I hope this guide was helpful getting you set up. Stay tuned to see my upcoming posts on everything from managing your store, guides to using WordPress, marketing, and checking out new plugins and tools to increase your money making potential!


