DIY Pocket Pillows: A Step-by-Step Guide Using Your Cricut
Have you ever found yourself needlessly searching for the TV remote, hidden deep within the couch cushions? Or maybe you’ve dreamed of a cozy corner filled with snacks, neatly tucked away in a crafty pouch? Today, I’m sharing how to create unique pocket pillows using your Cricut machinethat don’t just add a splash of personality to your home, but solve these everyday dilemmas too! Join me as I recount my favorite crafting moments from my own home.
TL;DR: Learn how to create your own pocket pillows, adding both style and functionality to your home with simple design and crafting techniques.

The Allure of Pocket Pillows: More Than Just Decor
Introduction to Pocket Pillows
Pocket pillows are an innovative and fun addition to home decor. You might wonder, what are they? Simply put, pocket pillows are cushions with a built-in pocket. This pocket can hold everything from remote controls to children’s toys. They’re not just pillows; they’re multifunctional tools that help keep our spaces organized.
Benefits of Pocket Pillows in Home Decor
Why should we consider pocket pillows? Here are some compelling reasons:
- Versatility: Pocket pillows can fit in almost any room—living rooms, bedrooms, or even playrooms.
- Functionality: Think about all the places where clutter accumulates. With pocket pillows, you have a stylish solution to hold your essentials.
- Style: They come in various fabrics and colors, elevating your decor.
As someone who loves blending style and function, I can say they’ve transformed how I manage my space.
My First Pocket Pillow Project
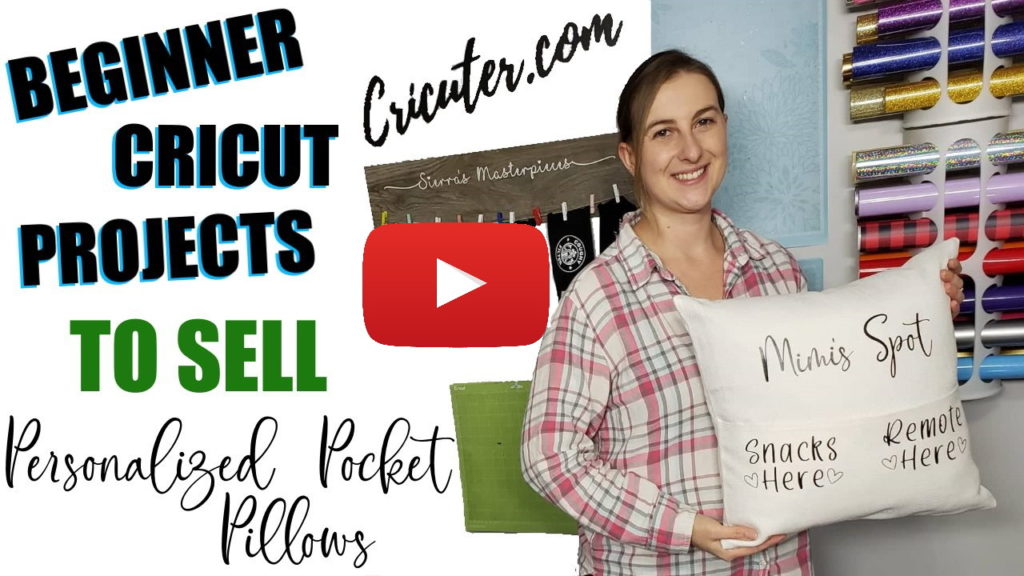
I still remember my first pocket pillow project. I was determined to create a pillow that said “Mimi’s Spot,” with pockets labeled “remote here” and “snacks here.” It took a bit of planning, especially figuring out the right size for the text. I’d never thought crafting could be so rewarding. A quote comes to mind:
“Crafting is not just a hobby; it’s an escape into creativity!” — Kerri
That’s how I felt.
The Versatility of Using Different Fabrics
Choosing the right fabric is key. For my pillow, I wanted something durable yet soft. Here’s how to approach fabric selection:
- Consider the purpose: Will it be used a lot? Go for sturdy fabrics.
- Think about comfort: It should feel inviting and cozy.
- Choose colors and patterns that match your home aesthetic.
Using vibrant fabrics can truly make your pocket pillow the star of the room! I often mix and match different patterns. The creativity is endless.
Pocket pillows are practical and stylish, ideal for homes filled with kids or pets. They’re not just for decoration but can be functional storage solutions as well.
Gathering Your Tools and Materials
The first step in creating your DIY pocket pillows is gathering all the tools and materials. This part is crucial. You want to set yourself up for success right from the start. Let’s take a closer look at what you need.
Materials Checklist for DIY Pocket Pillows
- Cotton or a cotton blend fabric for the pillow casing
- Canvas for a sturdier option
- Heat transfer vinyl (HTV) for designs
- Pillow inserts (16 inches is common)
- Complementary accessories like Teflon sheets and scissors
The fabric choice is key. Cotton is soft and easy to work with, while canvas offers durability. A blend of both gives you the best of both worlds. But remember, materials can vary wildly in quality. This is why choosing good quality fabric is essential, as it ensures your pillow lasts a long time.
A Tip About Sourcing Affordable Fabrics
If you’re on a budget, who isn’t these days? Here’s a quick tip: consider sourcing your fabrics from local thrift stores or clearance sales at major retailers. Online resources like Fabric.com and Joann.com often have sales. I’ve found some amazing deals if I wait for those weekly discounts. Want to really save? Buy in bulk or look for remnants. It’s surprising how much you can find in the clearance section!
Essential Tools
- Teflon Sheet
- Sharp scissors for precision cutting
- Heat transfer vinyl for personalization
And don’t overlook the little things! Complementary accessories like Teflon sheets are super handy when heat pressing vinyl. They protect your fabric from damage and ensure smooth results. Trust me, I’ve learned this lesson the hard way; there’s nothing worse than ruining a project because of a small oversight.
Gather your tools and materials wisely. This way, creating your pocket pillows will be a fun and fulfilling craft project. As I often say, getting the right materials is not just about aesthetics. It’s about practicality too! So, prepare yourself, and let’s get crafting!
Crafting Your Dream Pocket Pillow: A Step-by-Step Guide
Creating a pocket pillow is a delightful project. Not only is it practical, but it also allows for creativity. So, let’s dive into the essentials of crafting a perfect pocket pillow!
1. Designing Your Pillow with the Right Dimensions
Your first step is to choose the right dimensions for your pillow. A standard size that works well is 16 inches by 16 inches. This size provides a cozy feel while also leaving enough space for a functional pocket. As for the pocket, a size of approximately 5 inches by 5 inches is ideal. It’s big enough to hold items like a remote or a small book without being too bulky.
| Item | Dimensions |
|---|---|
| Pillow | 16″ x 16″ |
| Approx. 5″ x 5″ |
2. The Significance of Freezer Paper Templates
Next, let’s talk about freezer paper templates. Why are these important? First off, they ensure that your cuts are precise. Using templates helps you avoid common mistakes, like cutting the wrong size. I always take a moment to measure twice, cut once. It saves time and frustration!
3. Using Design Space for Personalized Text
Now, let’s add some personality. With Design Space, you can customize text for your pillow. Have you ever thought about adding names or fun phrases? It’s an easy way to make your pillow unique. Consider the name “Mimi’s Spot.” It links the pillow to a person and brings warmth to any room.
4. Step-by-Step Sewing Guidance
Finally, let’s get sewing! Follow these simple steps:
- Preheat your heat press to the desired temperature.
- Align and press your design onto the pillowcase.
- Stuff the pillow properly.
- Secure the pocket while making sure it’s centered.
And remember, as Steve Jobs said,
“Design is not just what it looks like and feels like. Design is how it works.”
Let’s ensure our pillow is not just beautiful but functional too!
In summary, crafting a pocket pillow can be a fun and creative endeavor. It’s all about thoughtful design, personalization, and practical steps. The joy is in the process, and each pillow holds a story waiting to be told.
Final Touches: From Cutting to Stuffing
Now that we are ready to get our hands a bit messy, it’s time to dive into the final steps of creating our pocket pillows. I find this phase exciting! It’s about transforming your fabric and vinyl into something cozy, personalized, and perhaps even gift-worthy. Let’s break it down.
1. Cutting Your Chosen Fabric and Vinyl
First, you need to cut your fabric and vinyl accurately. Measure twice, cut once! Use a rotary cutter for cleaner edges, especially with vinyl. A misting of water on cotton fabric helps to keep it from fraying. Don’t rush through this step; precision matters.
2. Layering for Perfect Ironing Results
When it comes to ironing, layering is key. Here’s what I do:
- Start with the fabric on a flat surface.
- Place the vinyl on top, shiny side down.
- Use a Teflon sheet to protect your vinyl while pressing.
Iron that carefully! The right temperature can make a world of difference. Social media often shows me folks who skip this—don’t be that person!
3. Using Personal Touches with Decoration
Let’s talk about personalization. This is where creativity shines! Names, quotes, or fun phrases like “Mimi’s Spot” really bring life to your pillows. You might ask, how can I make it unique? Consider:
- Choosing a special font.
- Adding embellishments like embroidery or fabric paint.
- Incorporating colors that resonate with the recipient.
4. Packing It Beautifully for Gifting
Finally, how you present your pillow matters. Want to impress? Try these tips:
- Wrap it in colorful tissue paper.
- Add a hand-written tag—it’s the little things!
- Consider including a small personal note inside the pocket.
This attention to detail truly makes it stand out.
Notes on Stuffing
Let’s not forget the stuffing! It plays an essential role in how your pillow feels. Here’s a quick run-down:
- Synthetic stuffing: Often softer and more affordable, typically around $10-$15.
- Natural stuffing: Can be pricier but offers a unique texture.
Make sure to choose wisely, as it impacts comfort during use.
As we wrap this up, think about all these elements coming together. With the right cutting, layering, decorating, and packaging, you’re not just making a pillow; you’re crafting a cherished memory. Can you see how exciting this process is? Let’s get stuffing and create something warm and inviting!
Embracing Creativity: Beyond Just Pocket Pillows
Creating custom pocket pillows is not just about the end product; it’s about the joy of crafting and the journey it inspires. These projects open up a world of possibilities. What if you could apply the same techniques to other home decor pieces? Let’s explore some of the wonderful avenues you can take.
Other Creative Projects
- Wall art: Use similar vinyl designs to create personalized wall hangings. You can even incorporate inspiring quotes.
- Table runners: Personalize them with monograms or seasonal designs; they instantly elevate your dining experience.
- Fabric bins: Use the same pocket techniques to create functional and stylish storage solutions.
These projects can give your home a unique touch. They reflect your style, just like those special pocket pillows.
How It All Began
My adventure in DIY started with these pocket pillows. Creating “Mimi’s Spot” wasn’t just fun; it ignited my passion for home decor. I discovered that personal touches can make a house feel like home. Have you ever felt that warmth when you walk into a room filled with things made with love?
Encouraging Reader Creations
I urge you to share your creations! What have you been working on? Each project tells a story, and your stories matter. You never know—your work might inspire someone else to start their crafting journey!
Eco-Friendly Tips
Being creative doesn’t have to harm the planet. Here are some tips for reusing materials:
- Scrap fabric: Instead of discarding leftover fabric, use it for smaller projects like coasters or keychains.
- Thrifted items: Look for inexpensive linens that can be repurposed; they often have character and charm.
- Natural dyes: Experiment with plant-based dyes for coloring fabrics instead of synthetic options.
We can make a difference. Let’s be conscious consumers while enjoying our crafts.
“Every creation begins in the mind of an artist.”
This experience has unlocked a myriad of crafting possibilities! I hope you feel inspired to beautify every corner of your home. Yours could be a cozy corner filled with personal touches, wrapped in creativity. Crafting isn’t just a hobby; it’s a chance to share your story, your style, and your artistic voice. So, gather your tools and let’s make something beautiful today!


