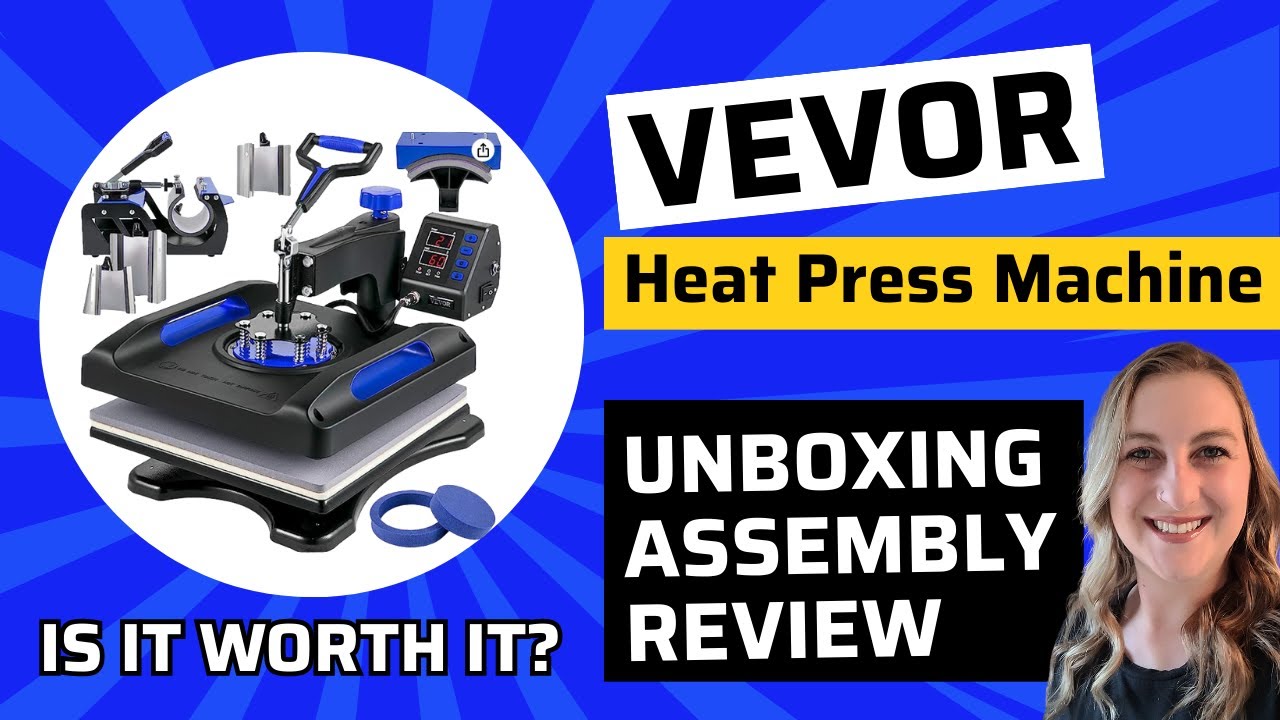
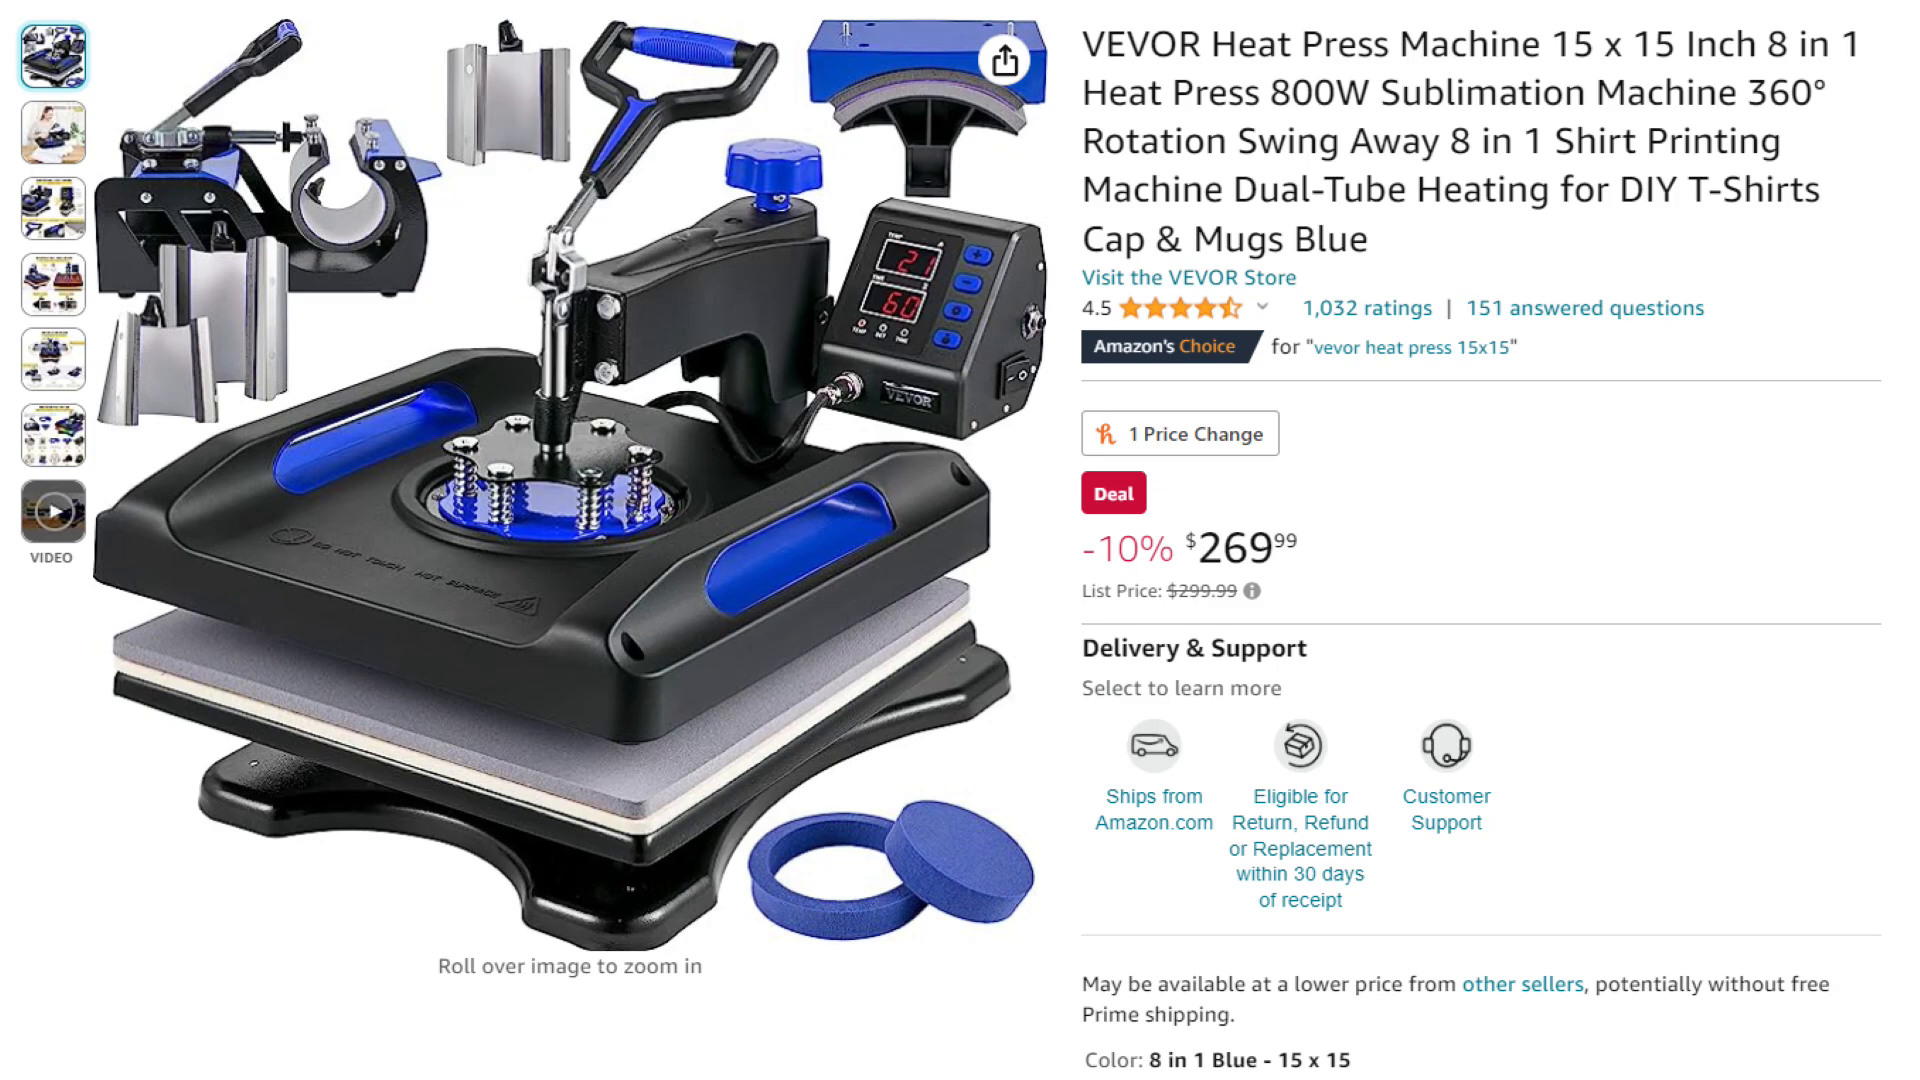
VEVOR Heat Press Machine: Unboxing, Setup, Review, and Performance Insights
If you’re on the hunt for a reliable and versatile heat press machine, you’re in the right place. Today, I’m excited to share my unboxing and review of the Vevor 15×15 8-in-1 Heat Press Machine. Whether you’re a seasoned crafter or just getting started, this machine offers a lot of bang for your buck. Let’s dive into the unboxing, setup, and my initial thoughts on its performance.

Table of Contents
- Introduction to the VEVOR Heat Press Machine
- Unboxing the Heat Press
- Key Features of the VEVOR Heat Press
- Assembly Instructions
- Temperature and Time Settings
- Accuracy Testing with a Temperature Gun
- Adjusting Pressure and Performance Insights
- Safety Features and User Experience
- Pricing and Value for Money
- Final Thoughts and Recommendation
Introduction to the VEVOR Heat Press Machine
One of the perks of being a YouTuber is receiving products to review, and today I’m thrilled to check out the Vevor 15×15 8-in-1 Heat Press Machine.
From hats to t-shirts, mugs to plates, this heat press can handle it all. It even comes with three different-sized mug presses for 9 oz, 11 oz, and 12 oz cups, giving you the flexibility to create customized drinkware.

Key Features
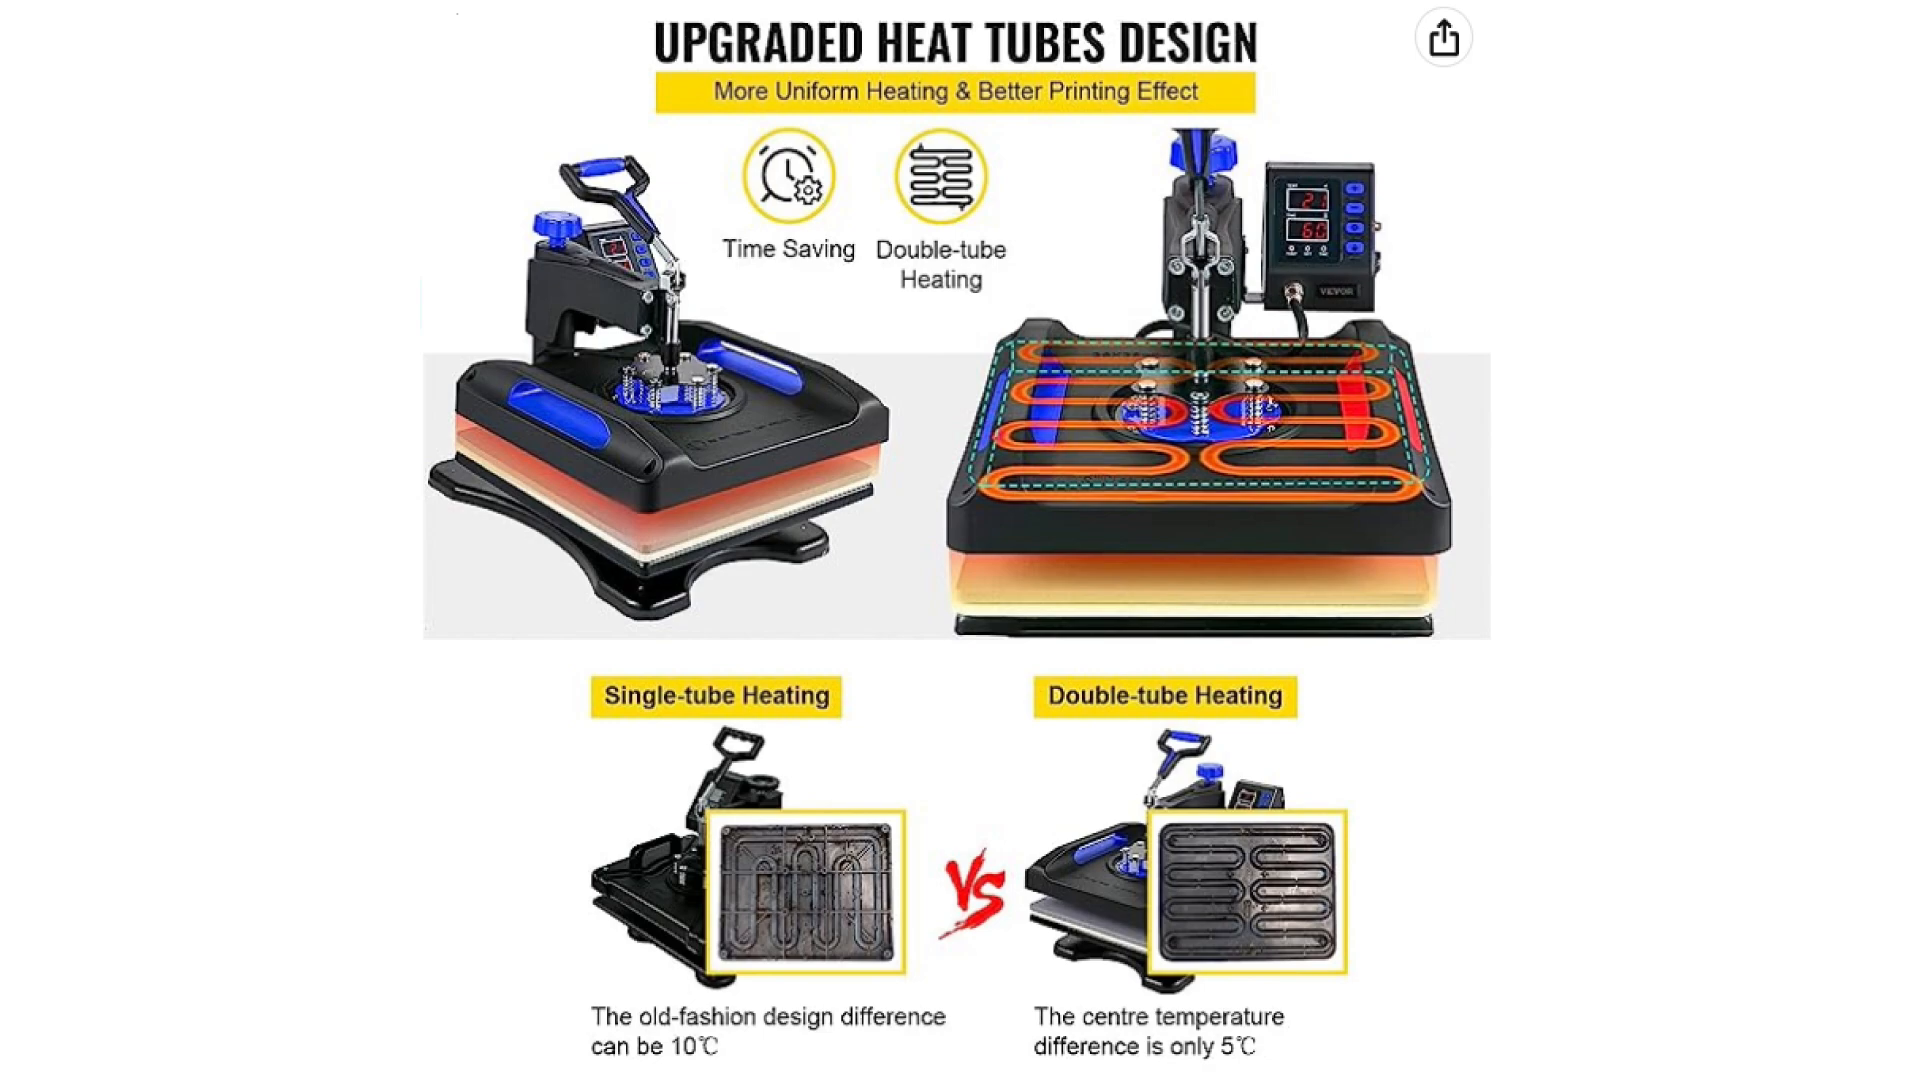
The VEVOR heat press machine heats up to a maximum of 210°C (410°F) and has a plate size of 15×15 inches, which is perfect for larger projects like 2XL shirts. I appreciate the double tube heating technology, which ensures even heat distribution across the plate, with only a 5°C difference between the center and edges. This feature is a step up from single-tube heating systems that can have over a 10°C difference, leading to inconsistent results.
Design and Safety
The Swing Away design makes the VEVOR heat press machine safer and more user-friendly. Unlike clamshell models, the Swing Away design allows you to move the hot part of the press away from your workspace, reducing the risk of burns.

Another standout feature is the built-in Teflon sheet, which means you don’t need to worry about adding a separate Teflon sheet when pressing designs onto shirts. The VEVOR Heat Press Machine also boasts two layers of insulation, ensuring the exterior stays cool to the touch—a crucial safety feature, especially if you have kids or pets around.
Specifications
- Maximum temperature: 210°C (410°F)
- Plate size: 15×15 inches
- Power: 1000 watts
- Hat press size: 6×3 inches (curved)
- Three mug press attachments: 9 oz, 11 oz, and 12 oz
- Plate press size: 8-10 inches in diameter
With these features and specifications, the VEVOR heat press machine is a reliable and efficient choice for any crafting enthusiast.
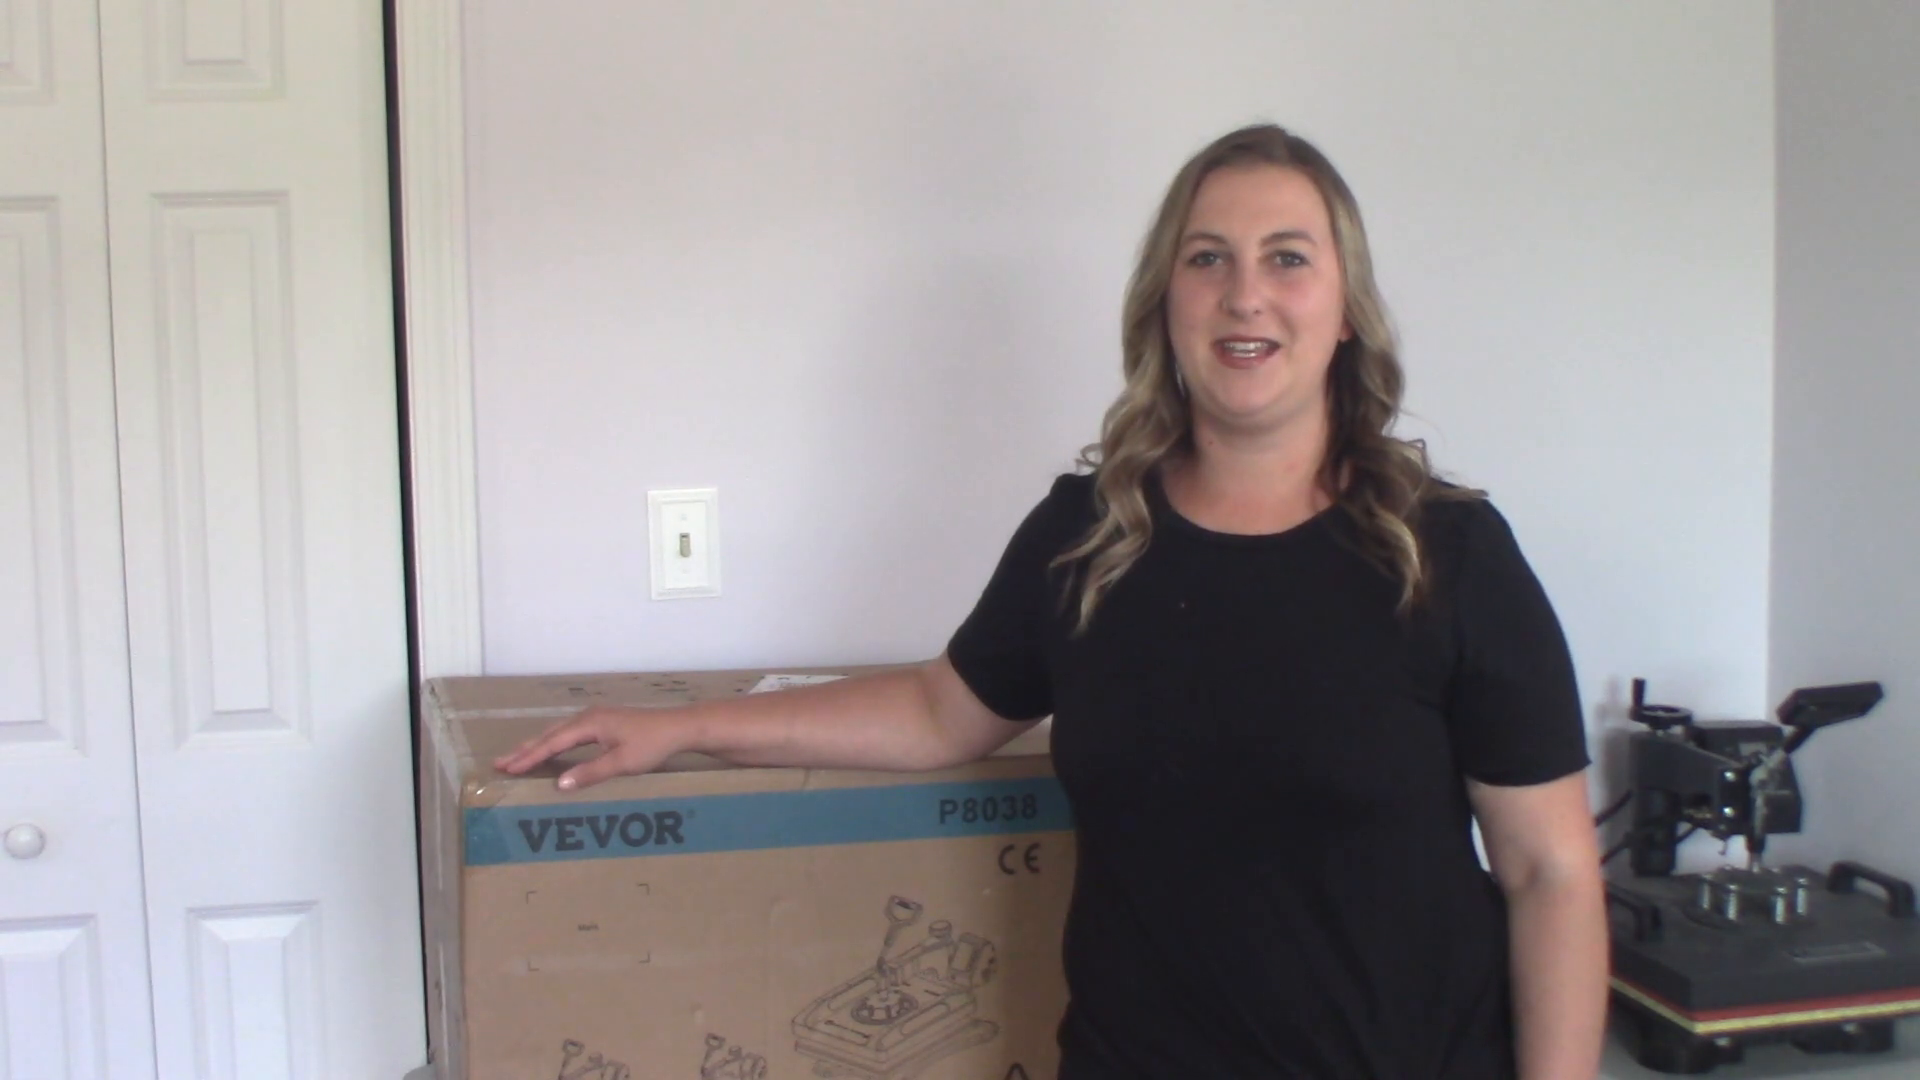
Unboxing the Heat Press
Unboxing the VEVOR heat press machine is an exciting experience, revealing a range of accessories for various projects. As soon as I opened the box, I was greeted with a comprehensive instruction manual and a variety of accessories that make the VEVOR Heat Press Machine machine a truly valuable and versatile addition to your Cricut craft room.
What’s Inside?
The VEVOR heat press machine comes with several accessories, making it a versatile tool for all your heat pressing needs. Here’s what you can expect:
- Heat press machine
- Three mug press attachments (9 oz, 11 oz, 12 oz)
- Hat press
- Plate press (8-10 inches diameter)
- Instruction manual
Initial Impressions
The first thing you’ll notice is the weight of the machine. It’s quite heavy, which is a good indicator of its sturdiness and durability. Make sure you have someone to help you move it to your desired workspace.
The accessories are neatly packed, and the instruction manual provides clear guidance on how to set up the machine. This makes the unboxing process straightforward and hassle-free.
Setting Up
Setting up the VEVOR heat press machine is simple. There are only two plugs to connect, which makes the process quick and easy. Here’s a brief overview:
- Unpack all the components and place them on a flat surface.
- Connect the main power plug to a standard 110V outlet.
- Attach the desired press attachment (e.g., mug press, hat press) to the machine.
Once everything is connected, your VEVOR heat press machine is ready to use. The intuitive design and clear instructions make the setup process a breeze, even for beginners.
Final Thoughts on Unboxing
Unboxing the VEVOR heat press machine is a rewarding experience. The quality of the components and the simplicity of the setup process make it an excellent choice for both beginners and experienced crafters.
With its robust build and versatile accessories, this heat press machine is sure to become an essential tool in your crafting arsenal.
Key Features of the VEVOR Heat Press
The VEVOR heat press machine is packed with features that make it a standout choice for crafters and DIY enthusiasts. Its design and functionality cater to a wide range of projects, ensuring high-quality results every time.
Double Tube Heating Technology
This feature ensures that the heat is evenly distributed across the surface of the press. It minimizes temperature differences, providing consistent and reliable results.
- Uniform heat distribution
- Improved efficiency and performance

Safety Features
The Swing Away design allows you to move the hot part of the press safely away from your workspace. This reduces the risk of accidental burns and makes the press more user-friendly.
- Two layers of insulation
- Built-in Teflon sheet
Versatile Attachments
The VEVOR heat press machine comes with multiple attachments, making it suitable for various applications. Whether you’re pressing t-shirts, hats, mugs, or plates, this machine can handle it all.
- Three mug press attachments
- Hat press
- Plate press
Assembly Instructions
If you’ve been intimidated by the idea of setting up a heat press, don’t worry. The VEVOR Heat Press Machine is straightforward to assemble. There are only two main plugs that you need to connect: one for the attachment and another for the power source.
Unpack and Prepare
Start by unpacking all the components and placing them on a flat surface. Ensure you have all the necessary parts before you begin assembly.
- Heat press machine
- Control unit
- Power cord
- Attachments
Attach the Control Unit
The control unit, where all the magic happens, is easy to attach. Each accessory has its own plug that fits into the control unit. Simply find the correct groove, plug it in, and twist to secure it.
- Slide the control unit into the designated brackets.
- Ensure it is securely in place.
- Connect the control unit to the machine using the provided plug.

Connect the Power Cord
The power cord connects the control unit to a standard 110V outlet. This step is essential for powering the machine.
- Remove the protective cover from the power cord.
- Plug one end into the back of the control unit.
- Plug the other end into a wall outlet.
Attach the Desired Press Attachment
Select the attachment you want to use (e.g., mug press, hat press) and connect it to the machine. Each attachment has a specific plug that fits into the control unit.
- Find the groove on the attachment plug.
- Line it up with the port on the control unit.
- Insert and twist the plug into place.
Once connected, your VEVOR heat press machine is ready to use. The assembly process is designed to be simple, even for beginners.
Power On and Test
After assembly, switch on the control unit using the on/off switch located on the side. Conduct a test run to ensure everything is functioning correctly.
With these steps, your VEVOR heat press machine will be ready to tackle any project you have in mind.
Temperature and Time Settings
Setting the correct temperature and time on the VEVOR heat press machine is crucial for achieving optimal results. Here’s how to do it.
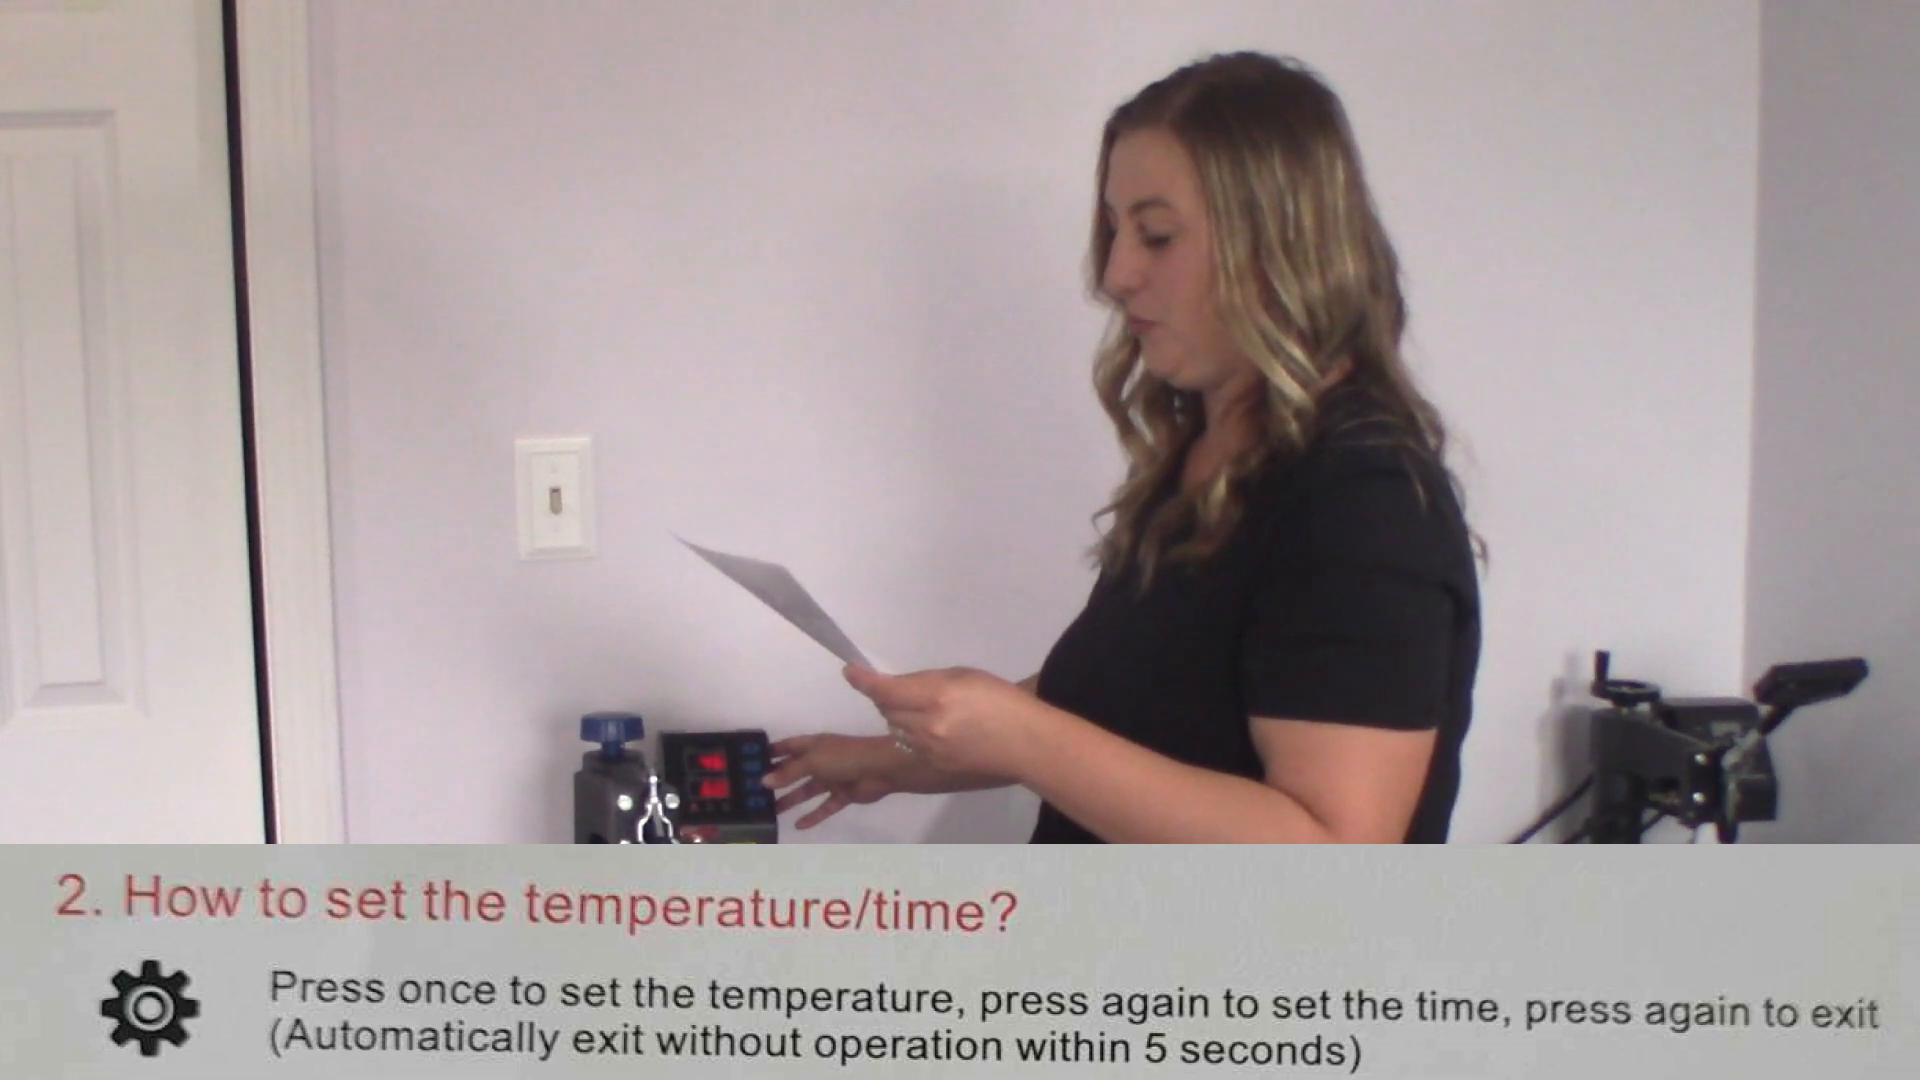
Adjusting the Temperature
The VEVOR heat press machine has four buttons: plus, minus, setup, and mode. To set the temperature, press the setup button.
Press the setup button once to enter the temperature setting mode. The current temperature will be displayed, and you can adjust it using the plus and minus buttons.
The ideal temperature depends on the type of vinyl you’re using. For example, puff vinyl may require a different temperature than easy weed heat transfer vinyl. Always check the manufacturer’s recommendations for the correct settings.
Switching Between Celsius and Fahrenheit
The machine defaults to Celsius, but you can switch to Fahrenheit. Press and hold the plus and minus buttons simultaneously to change the unit of measurement.
Once switched, press the setup button again to adjust the temperature to your desired setting.
Setting the Time
Press the setup button twice to enter the time setting mode. The current time setting will be displayed, and you can adjust it using the plus and minus buttons.
The default time is 60 seconds, but you can lower or increase it based on your specific needs. For instance, you might set it to 20 seconds for certain projects.
Finalizing Settings
After adjusting the temperature and time, press the setup button again to exit the settings mode. Your VEVOR heat press machine is now ready for use.
The machine will beep to indicate it has reached the set temperature. If it heats up too quickly, it may exceed the desired temperature, so keep an eye on the display.
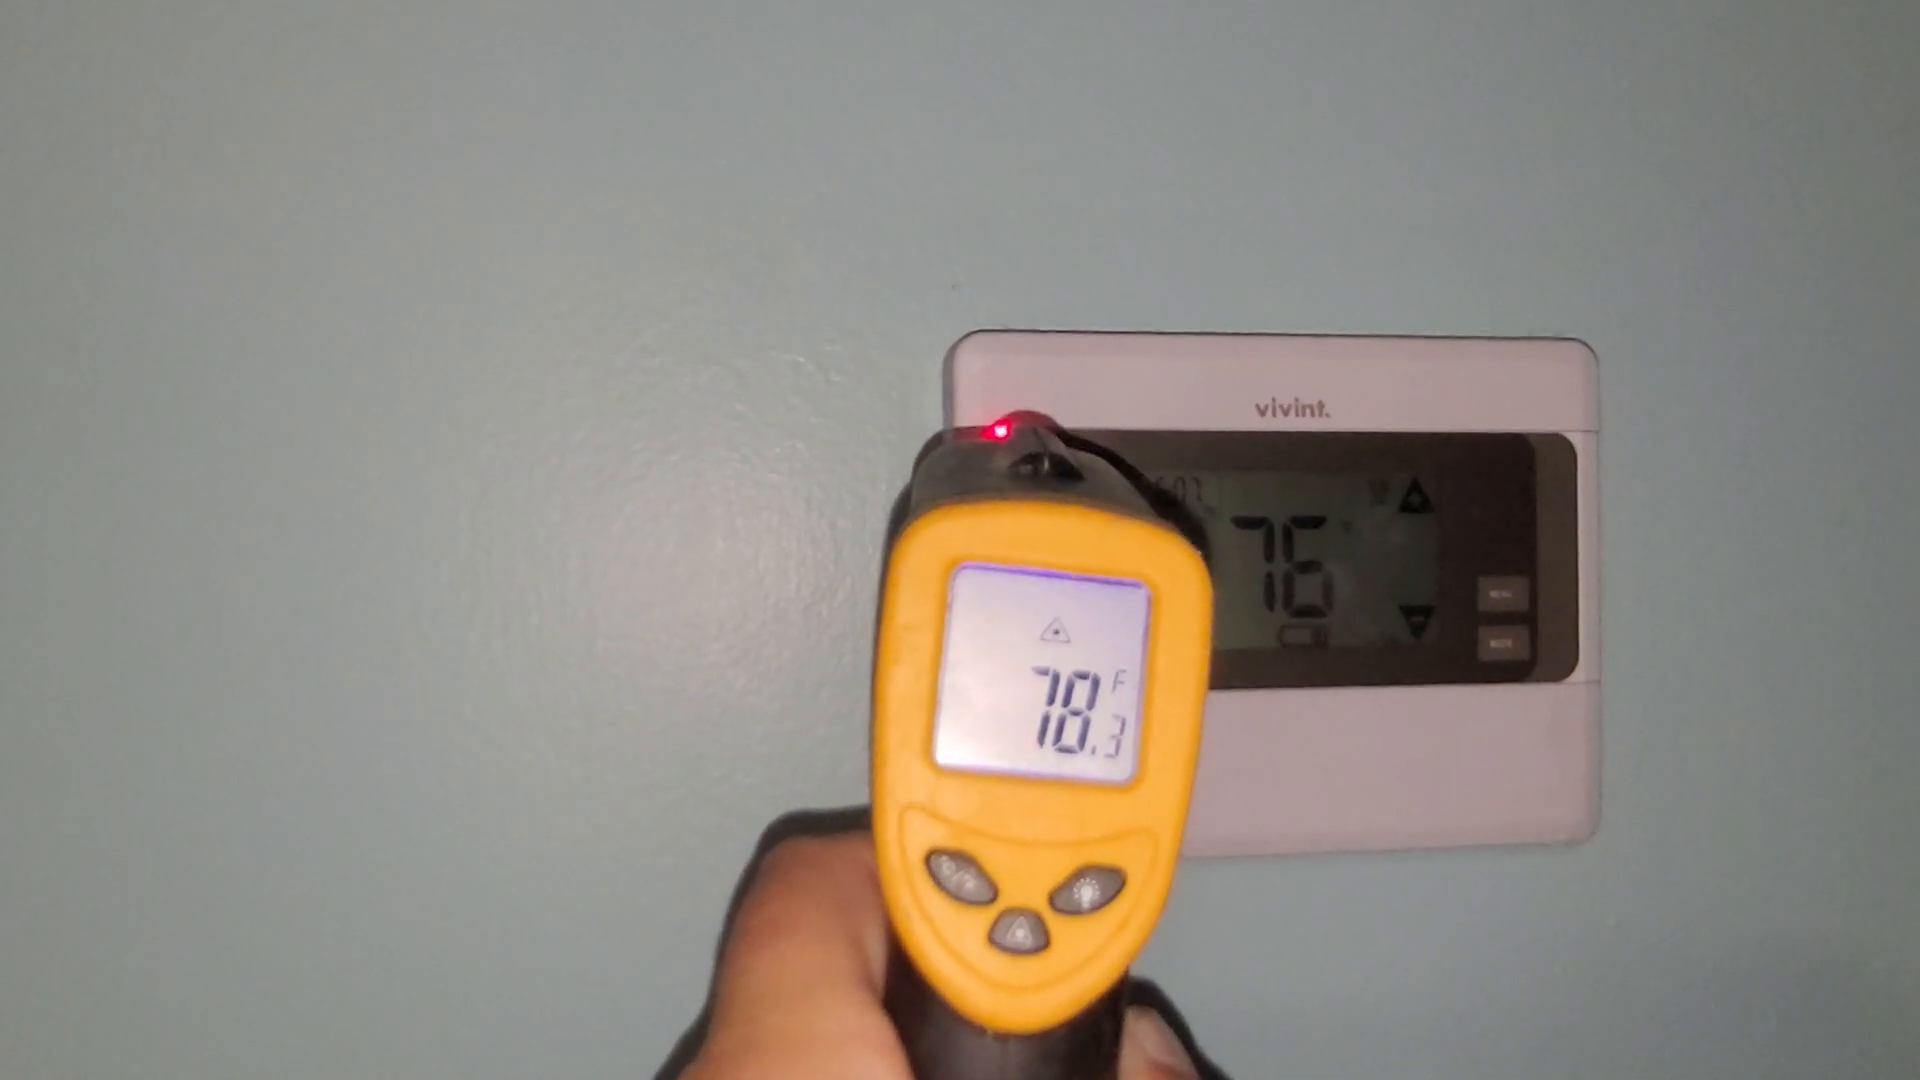
Accuracy Testing with a Temperature Gun
Ensuring that your VEVOR heat press machine reaches the correct temperature is essential for consistent results. Here’s how to test its accuracy using a temperature gun.
Using the Temperature Gun
To test the machine’s temperature, swing the top plate to the side and point the temperature gun at the center of the heating element. Most temperature guns have a laser beam to help you aim accurately.
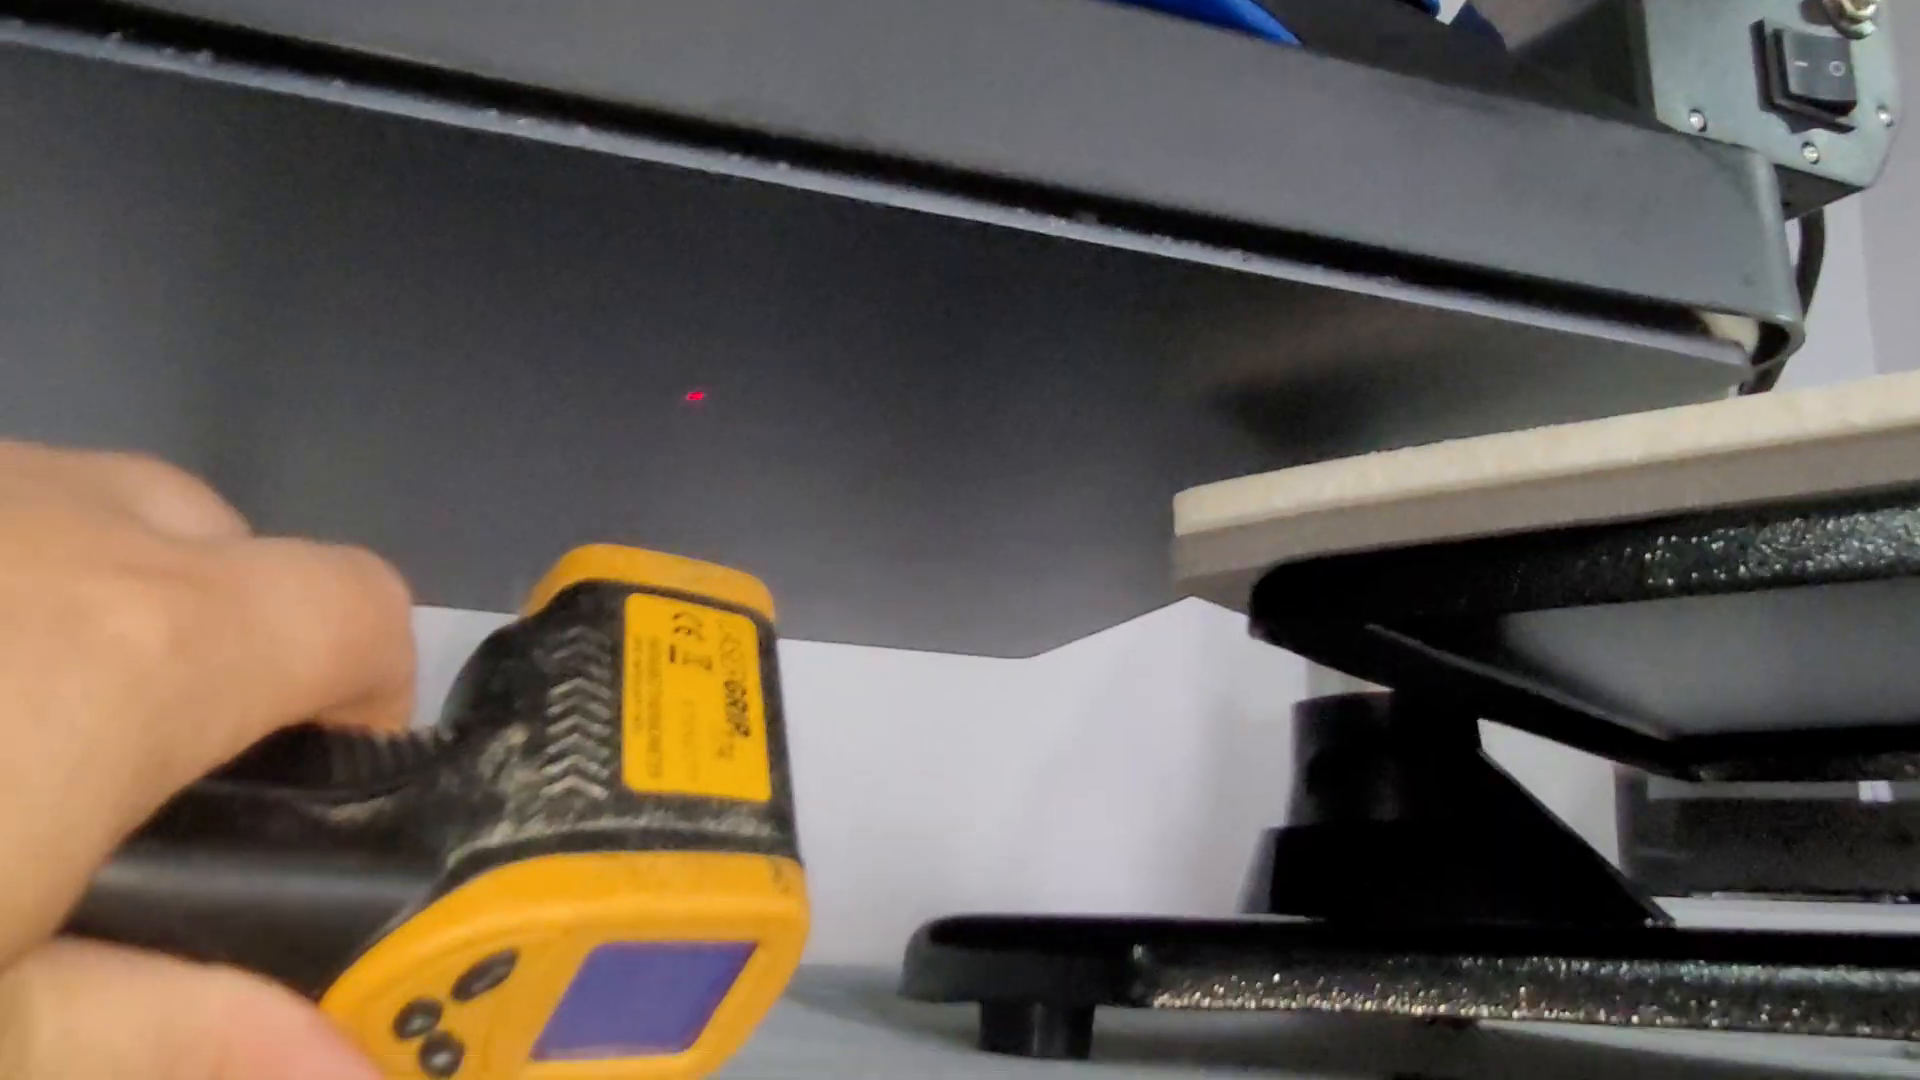
Reading the Temperature
Hold the temperature gun steady for a few moments to get an accurate reading. Compare the reading from the temperature gun with the temperature displayed on the machine.
For example, if the machine is set to 300 degrees Fahrenheit but the temperature gun reads 280 degrees, there may be a discrepancy.

Verifying Accuracy
To verify the accuracy of your temperature gun, compare its reading with a known accurate source, like a thermostat. If the temperature gun is only slightly off (e.g., 2 degrees), it’s likely accurate enough for most purposes.
In our test, the temperature gun was only 2 degrees off from the thermostat, confirming its accuracy. This indicates that the heat press may not be heating up to the full 300 degrees as indicated.
Conclusion
Regularly testing your VEVOR heat press machine with a temperature gun ensures it maintains accurate temperature settings. This practice helps achieve consistent and high-quality results in all your heat press projects.
Adjusting Pressure and Performance Insights
Understanding how to adjust the pressure on your VEVOR heat press machine is crucial for achieving the best results. Here’s a quick guide.
Pressure Adjustment
To adjust the pressure, use the knob located at the back of the machine. Tightening the knob to the right lowers the plate, increasing pressure. Loosening it to the left reduces pressure.
For optimal performance, I prefer high pressure to ensure the design adheres tightly and evenly. This is especially important for certain vinyl types like puff vinyl.
Assembly and Initial Performance
Assembling the VEVOR heat press machine is straightforward but requires a second person due to its weight. It heats up quickly and is easy to adjust settings.
Accuracy is generally within 10-15 degrees of the set temperature, which is acceptable. Using a heat gun can help verify the machine’s temperature accuracy.
Recommendations
If you don’t have a heat gun, I highly recommend getting one. It ensures your machine heats to the correct temperature, which is vital for consistent results.
One downside is the loud beeping when the machine reaches temperature. However, this can be turned off according to the instructions.
Safety Features and User Experience
The VEVOR heat press machine comes with several safety features that enhance the user experience. These features ensure both safety and efficiency during use.
Double Insulation
The machine is designed with double insulation, which keeps the exterior cool. This is vital for preventing burns and ensuring safe operation.
The specs indicate that the exterior should not exceed 50 degrees Celsius, making it safe to touch even during operation.
Pressure Adjustability
One of the standout features of the VEVOR heat press machine is its adjustable pressure. This is particularly useful for different types of vinyl that require varying pressure levels.
Unlike some auto heat presses, this machine allows for precise pressure adjustments, making it versatile for various projects.
User Experience
Overall, the VEVOR heat press machine offers a user-friendly experience. The ability to adjust pressure and the quick heating time are significant advantages.
Despite its minor drawbacks, such as the loud beeping, the machine’s features and performance make it a reliable choice for crafters and DIY enthusiasts.
Pricing and Value for Money
The VEVOR heat press machine is typically listed at around $269. This makes it a relatively affordable option for those looking to invest in a reliable heat press machine.
Cost-Effectiveness
Given its features, such as fast heating, accurate temperature control, and adjustable pressure, the VEVOR heat press machine offers good value for money. It meets the essential needs of both beginners and experienced crafters.
Comparing Options
When considering whether to purchase this machine, it’s important to compare it with other models. Some heat presses may offer additional features, but at a higher cost. Weighing these factors will help you make an informed decision.
Ultimately, your budget and specific needs will determine if this machine is the right fit for you.
Final Thoughts and Recommendation
Overall, the VEVOR heat press machine is a solid choice for anyone looking to explore heat pressing. Its combination of features and affordability makes it a compelling option.
Pros and Cons
This machine heats up quickly and offers precise control over time, temperature, and pressure. These features are crucial for achieving high-quality results in various projects.
The only cons I can think of are the weight of the machine can make it difficult to move around, and sometimes the beeping can be excessive. However, these are very minor issues.
Recommendation
We recommend the VEVOR heat press machine for crafters and DIY enthusiasts who are looking for a reliable and versatile tool. While there are other options on the market, this machine strikes a good balance between price and performance.
Take the time to research and compare different models to find the best fit for your needs. Happy crafting!
Cricuter’s Recommended Deals
- Sign up for Creative Fabrica’s FREE trial
- Sign up for Creative Fabrica’s discounted yearly subscription
- Shop the best deals on Cricut machines
- Accept credit card payments with your FREE Square Card Reader
- Check out my Linktree
Connect with Cricuter
Some of the links provided are affiliate links. Cricuter is a participant in the Amazon Services LLC Associates Program, an affiliate advertising program. As an Amazon Associate, we earn from qualifying purchases. This means, at no additional cost to you, we will earn a commission if you click through and make a purchase.
Made with VideoToBlog